Lighting Up A Living Room: Project 4
November 6th, 2018


Bringing in several photos that explore the different kinds of lighting around campus and Pittsburgh, we were able to discuss what kinds of light exists and what their function is, especially within the context of the setting that the lighting is in, whether it is in a restaurant or a gym.
I also wanted to make sure to focus on the colors of light, whether it was white or yellow (or rainbow), and to try and determine how that changed the mood of the students. I noticed on campus, there was mainly a lot of yellow light, which makes sense because yellow light is more comfortable on the eyes, especially helpful for students who are studying for most of the day. The rainbow/colored lighting was mostly for decoration (i.e. the Hunt Library, the Rainbow Bridge). And finally, the white lights I observed were outside, which I thought was because white light is brighter than yellow, it illuminated the paths along campus better and allowed students to walk through them safely.

November 7th, 2018
We were tasked with experimenting with different types of paper and folds in order to see the nature of the lightbulb and how different things we do with the paper affects how the light permeates through the paper and where it shines the most. I experimented with paper through different materials (letter paper, paper towels, and tissue paper) with purposeful cuts and simply crumpling it up.


November 8th, 2018

November 11th, 2018
Taking a trip to IKEA to study different kinds of light and lamps, we all spent about 5 hours in the store. We all came out with a couple of light bulbs (and a Christmas tree for our studio, Merry Christmas!). I got one light bulb that was in a spherical shape and the diameter was much bigger than the one we got during class. Though the light warmth was the same, I was glad to have one that was a different size.


November 13th, 2018
We started trying out different ideas of how we can convey the context of our piece with the white paper. I wanted to go for something simple and not too distracting, as hanging out with friends in a living room, you don’t want the light engine to be right in your face, you want it to be out of the way and not the center of attention, but you still want it to be functional. However, I also wanted the light engine to reflect some creativity and unconventionality since hanging out with friends is supposed to be a very light, social, and fun event.


This first idea didn’t work since I measured it wrong and so I ended up not being able to fully test it around the lightbulb. However, I chose not to continue with this idea though, because while I was in the process of building it, I realized I didn’t like how the lightbulb was exposed in some areas because of the design, as it made me too uncomfortable and anxious. Also, I thought since my lightbulb was so bright, the fact that it was exposed in so many areas would cause the users to not be able to see due to the bright light.


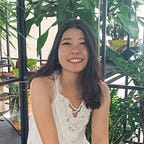
I was much more satisfied with this second idea, I enjoyed how the light permeated the center cylinder and spread to the wings. I also thought it reflected the casual and simple atmosphere that hanging out with friends in a living room gives off.


I didn’t enjoy this idea as much, for the same reason I didn’t enjoy the first idea, as the lightbulb itself was too exposed. Due to the high wattage count of my bulb, the parts where the lightbulb was left exposed hurt my eyes too much to look at it and it was more painful than enjoyable when I hung it up.
November 15th, 2018
In the end, I chose to show my second idea during the critique because I felt the most confident about it. I also had more excitement and energy when thinking about how to make this idea better and more efficient. It was the idea that I thought had the most potential and again, the simplicity of it was what drew me in the most.

November 19th, 2018
I tried to cover the socket up since that was the main issue of my lighting engine, but that caused a lot of different problems since when I raised the cylinder up more, the light got trapped inside the bottom half and didn’t spread to the top area, causing my light engine to become only half-lit. Another problem I encountered was the fact that my lamp is noticeably crooked. My assumption is that this is because of the wings. The wings jutting out of my light engine are different sizes all around the cylinder (and therefore, are different weights). So, there is one side that is much heavier than the other and is weighing it down the the other side, since there is nothing stabilizing the engine but a cord.


November 20th, 2018
This model was not my best iteration, which was mentioned a lot during our class critique. To start off, as I mentioned before, the professors commented how the entire model is very crooked. The glue marks from the hot glue gun was also very noticeable and the craftsmanship was off in that the seams from the circles glued on top of the cylinder wasn’t glued all the way, which made the light shine through some of the ripped seams. All of the feedback was very helpful though, and even though I’m not entirely sure what direction to go from here, I decided to make my model again, taking care to make sure that there are no seams in which the light can come through, and brainstorm through prototypes how I can balance my engine while still keeping the essence I have created with my engine.
Below, is a peer review sheet we filled out in class for one another. I think based on the feedback, I am going to continue on the direction I am going, but possibly experiment with the shape of the wings (which may also help with the balance of my light engine).

A couple of things that my current fan looks like is:
- vertical jump tests
- propeller
- windmill
- knives
- fan
- fiesta-ish
This is not really what I was going for, I don’t really want people to hit it. However, the reaction and associations that my classmates gave me regarding my lamp are very helpful in my next steps to try and fix the association of my engine with possibly something a little more natural.

November 26th, 2018
Taking to heart all of the reviews that I received Thursday, I started off by my turning my cylinder into a 15 sided polygon. Then instead of leaving my planes jutted out, which made it look like a ceiling fan, I drew in the edges together to make it into a flowery shape, which also solved the problem of the imbalance of the light engine. I feel a little better about this model, but I know already that I’ll have to make another one for the final version due to the inconsistency when I was drawing the the edges of the planes to make the curves as well as the bottom. When the light shines through the bottom, the tabs I used to glue on the sides to the bottom show, which does not look very clean and will be something I will have to fix.


November 27th, 2018
Since today was a work day, I was able to get feedback from various people about my new design. To solve my problem of the bottom tabs of my engine.

I was given the idea of not having a bottom of a polygon at all. However, since the light would probably come off as too strong, the bottom of the polygon can be moved up inside my engine, that way, I can still cover my light to make it not as bright, while also using the tab system, but be able to hide them underneath the spiral.
My main thing now is to make everything cleaner, to make sure that no seams are open (so that the light won’t shine through them), and also to make sure that the engine looks clean from every angle. (Especially the bottom that I had previously neglected).
I am told that my design now looks like:
- an airplane engine when turned on its side
- a flower
- just satisfying in general because of the spiral
November 28th, 2018
This is almost my final. Looking closely at it, the lamp is still tilted slightly to the left, but the solution with the tabs worked!

I added more petals on my lamp in the hopes that the lamp would balance itself out if I did. Which I think it worked for the most part. I also noticed that some of the petals in this tilted inwards while others tilted outwards, and so I had to reglue the petals so that they all tilted outwards.


I’m pretty satisfied with my lamp in that every draft I think was better than the previous one and I think that compared to my model a week ago, this one is much better. There are still some things wrong with it craftsmanship-wise, I think sometimes I was trying to push the paper material to fold and curve in ways that it didn’t want to. But as a whole, I think I learned a lot from this project. I learned how to work with a different material. And I felt more confident coming into this project because it slightly reminded me of the earlier cardboard carrier project. I was glad I had a clear process to my final. This project was a nice conclusion to our projects in studio class, looking back, I was able to gain a lot of knowledge in each project on how to push forward and what to look for in each project, while also gaining more experience working with different types of materials.